Airbrushing (from Steelnavy/1250 MB)
Posted by Paul on 9/7/2010 on 9/7/2010
|
I've been using my Paasche #1 for at least 30 years now, but I still sometimes get it wrong. I gave up on enamels about 20 years ago and have used acrylics ever since (except for Dullcote which I use to finish the job). While enamels are easier to airbrush as they tend not to clog the brush, I find that acrylics are more forgiving, and when I want to brush them on, rather than spraying, they are easier to use and blend better with the airbrushed sections without leaving any visible brush strokes. They are also much easier to clean up. On the negative side, acrylics are harder to airbrush on. They tend to clog the tip if too thick and tend to lump up over time in their original jar. If your paint has lumps or bits which have accumulated in the jar, use a fine strainer when pouring paint into the airbrush cup. The strainer will pick up the bits and can easily be cleaned with soap and hot water. If mixed too thin acrylics will go on runny. So air brushing with them takes a lot of practice. If your paint is drying while in the air, then one or two factors are at work: first you are spraying too far from the model, so that the paint is actually drying before it hits the model, and/or second, the ambient air is too warm. Better to spray at night or when it's cooler.
You should have an exhaust fan regardless of whether or not you are using acrylics or enamels. I have neverused extenders and see no need to use them. If your paint is the consistency of skimmed milk it should work fine. If you find that the paint is still clogging the nozzle, try backing the needle out just slightly or opening the end cap just a bit. that will increase the flow.
Most critical is cleaning of the airbrush. You should clean it thoroughly after each use. Any residual paint whatsoever, no matter how slight, is likely to interfere with the operation of the brush. Merely blowing water or solvent through after use is not sufficient. I always disassemble mine, cleaning out all parts with pipe cleaners and ensuring that there is no paint or other film in brush.
I have no intention of replacing my airbrush. Paasche's are good, reliable tools, and getting something else won't guarantee results. It's the operator, not the brush that makes it work right.
.........................................................................................
Posted by John Youngermanon 9/7/2010
| I have been using a Paasche single action for many years and find it works great. You might think about (1) not thinning the acrylic paints as much as you do, or using denatured alcohol with or instead of water; (2) buying a 12" fan and setting it up so it blows behind you and ventilates the room; (3) using enamels such as Model Master in the USA or your own favorites if in Europe, and thinning with lacquer thinner instead of mineral spirits or paint thinner--sprays better, dries really quickly, results are beautiful. Just toss away the thinned paint after use--don't return it to the bottle/tin. I find that I use so little paint and have so little overspray that I have rarely had a problem using enamels this way. I sometimes mask and spray the camo, sometimes brush it, but always spray the "base color" coat. Use clear flat after painting (Testors Dullcoat is what I use) to give the model an overall flat tone. If you are careful, you can even spray enamel over an acrylic base coat. I have brushed enamel over acrylic and had no problem. And of course you certainly can use acrylic over an enamel base coat. I don't recommend retarders. Very difficult to get amount right. And who wants a wet mess for hours? | |
Cleaning old metal castings (from Steelnavy/1250 MB):
Posted by Al Fisheron 7/8/2010
|
Those of us who also restore toy soldiers are very familiar with this problem. Your inital instinct is good . . . wash with soap and water. Then soak in vinegar for an hour or so, rinse really well, dunk in mineral oil (e,g., baby oil) and let dry before priming.
Cleaning acrylic display cases (from Ship Model Forum):
I had a few questions recently about cleaning the acrylic I use on the custom display cases I build for modelers, and wanted to let all know who might not know what I would recommend. I use Novus, #1 Plastic Clean & Shine just like window cleaner, which I would never recommend. Spray it on and wipe with a soft cotton diaper like material till the surface is clean and dry. This also helps to eliminate dust collection since it has an anti static property. Just my thoughts and it works great for me. Thanks all, Ron, http://www.grandpascabinets.com
Decal Application (from Ship Model Forum)
by Timmy C Fri Jul 09, 2010
1. clear gloss coat on your model (so that the transparent edges of your decal won't be as apparent)
2. apply decal
3. clear flat coat (to seal in the decal and give the model the proper flatness)
Voila! That's it in a nutshell.
As for applying the decals themselves, it differs, but it usually involves wetting the backing paper and decal thoroughly and then placing it on a towel or something and waiting 20 seconds or so until the decal is easily movable on top of the backing paper. Once that's done, move the decal and backing paper to where you want the decal to be placed, and then slide the decal onto the model from the backing paper. If the decal needs to be repositioned, wet your finger or put a drop of water over the decal.
|
"Lead Rot" Treatment (from 1250scale)
Posted by GHE on 12/11/2010
The key is to use proper safety equipment because the lead oxide particles are very toxic and easy to stir up. A vaccum with very fine filters is the first step -- but it has to have the finest filters possible and these will become contaminated after the procedure. Some folks try to save the models by removing them from the wooden bases and washing them in a vinegar solution -- although I would surmise a mild base solution might be as effective. Try not to stir up the white rot by scraping or sanding it off. I suspect one could use a toothbrush on the white rot areas WHILE the models are completely submerged in a mild acid solution, but once the rot is so bad that paint is flaking one wonders if it is already to late. Once all the rot is removed, a coat of sealant, such as an auto primer can be used to cover the metal and perhaps keep the rot at bay. But you have to find a means of long-term storage that is gentle. I prefer glass shelves or acrylic cases.
If you see white dust/powder starting to get into the air during the fix -- just discard the models. I am sure they can be handled by a place that deals with used metal, and I know how hard it is to dispose of art. But here we have definite health issues at play, and you are better served to either buy old sets that are free of lead rot, or to get new models that use much more durable alloys.
| _________________________________________________________
Paint removal from models (from Steelnavy/1250 MB):
Posted by Mike Werneron 5/18/2010
|
I've been successful using Pine Sol and a toothbrush. Let it sit a little bit before brushing.
............................................................................................
Posted by Roger Dawsonon 12/19/2010
|
Neptun uses a water-based paint these days.
The general rule with models is to use an inorganic stripper on plastics (including resin) - one containing sodium hydroxide (caustic soda), read the label on your chosen poison, and an organic stripper on metal ships (Nitromors or one containing methylene chloride).
Sodium hyroxide dissolves skin and animal fats, methylene chloride is a systemic poison and creates havoc with the environment when it goes down the drain.
...........................................................................................
Posted by Dave Willcoks on 1/16/2011
For the models that paint stripper wont touch i use Break Fluid which gives very good results against all paints used on metal model ships. Remember it is corrosive so needs to be handle with care, I use a large coffee jar to hold the fluid and submerge the model on the end of a bit of string checking occationally to see how its lifting.
The paint tends to lift as one and once fully released the model can be lifted up and left for the liquid to drain off.
Once drained,most of the paint can be pulled of using tweezers. Wash the model in white spirit to remove any lingering brake fluid and leave to dry. Any paint left can be picked of using various tools, watch makers screw driver set are good for this task.
When the model is fully back to bare metal if its a kit the model should fall apart so glue can be removed the model reassembled etc.
With both kit and one piece model it is best to wash again in white spirit before repainting to insure all traces of brake fluid have been removed.
This method is not for the faint hearted and great care has to be taken and should only be used as a last resort. Remember to wear gloves and goggles at all times when using chemicals. Also you cant tip Brake Fluid down the drain so once its past its usefullness it has to be disposed of responsibly. | | |
Rigging (from Steelnavy MB)
Posted by Bob Cicconion August 22, 2010
| Whenever you're rigging a ship- particularly an older, pre-dreadnought, you need to look at as many photos as you can to get an idea of the various rigging patterns that a given ship had during its service life. I generally Google the ship name and look under "Images" and you can generally find a bunch of good photos and also sites that have a lot of useful info on a particular ship. One problem, however, is that you can have 5 photos of a ship, and the rigging could be slightly different in all five, due to changes in equipment, rebuilds, modifications, the year the photo was taken, etc. The only thing you can do is to be as accurate as possible, keeping in mind that no one can actually tell you that you are wrong about your choices because of the reasons listed above. My personal belief is that the overall impression is more important than 100% technical accuracy. If you actually rig a ship with every single wire that was present, you'll 1) go crazy, and 2) wind up with a ship that may look overwhelmed by the rigging. I try to put on the minimum amount of rigging while still trying to make the ship look like it's rigged correctly. |
Stretched sprue (from Ship Model Forum):
Making stretched Sprue
-----------------------------
This is a simple process that can yield enormous quantities of supremely fine modelmaking material-completely free!
Traditionally one would hold a piece of sprue over a candle and pull apart slowly.
For rigging this has the disadvantage that it often results in uneven thickness and can contain small lumps. This is because as the sprue is stretched one side cools-and the other then stretches-this unevenness is reflected in the final result.
It is also important to use 'good' sprue.
I have for years been slowly melting down the runners and parts of a black moulded Airfix HMS Victory for standing rigging--and the brown plastic spars of a wrecked Revell Cutty Sark...
The raw material for stretched sprue does not have to be sprue-it can also be the actual plastic parts
 Viewed 2707 times")
When making stretched Sprue I recommend doing so in a room that is ventilated by a very gentle draft - ideally adjacent to workbench- the byproduct of smoke or smuts that can occur when heating styrene should be removed by the ventilating breeze-not the stretched sprue produced form the bench!!
My favourite method is to hold the sprue in my left hand-and the lighter in my right hand.
 Viewed 2589 times")
Light the sprue by holding the flame to the SIDE of the sprue piece flame
 Viewed 2565 times")
--allowing it to just catch light
 Viewed 2551 times")
Drop the lighter on the bench, change hands whilst blowing the flame out and dab the molten end of the sprue onto the far end of a piece of white smooth card( I steady the card on the bench using my left hand)
 Viewed 2545 times")
Initially for the first 2 inches( 50 mm) or so pull gently until the desired diameter is reached
 Viewed 2555 times")
Once the correct gauge has been reached( within a split second) pull away swiftly as far as your arm can reach
 Viewed 2564 times")
Stretched Sprue is free- so make as much as you can use in a given rigging session
 Viewed 2626 times")
It can be made thick or thin to choice
 Viewed 2571 times")
Preparing to rig with stretched sprue
----------------------------------
Rigging a 1/700 modelship is a tricky thing to photo-document effectively. The following is in the main a text description.
Tools required for successful sprue rigging!
 Viewed 2701 times")
1 Fine tweezers- parallel at the ends-all sharp edges polished to round using very very fine 'flour' abrasive paper-very light pressure action
2 Fine tweezers- as above- but more pressure required- gives better feel when in delicate situations-prevents the tweezers 'sliding' out of grasp
3 Fine tweezers, as above but cranked at ends; ideal for threading in between tripod mast legs and existing strands of rigging without damage
4 Sharpened cocktail sticks- use these for application of the cement- unlike pieces of wire these can be operated under perfect control - without flexing or springiness- and thereby not damaging the delicate rigging that may be adjacent to the piece of rigging being installed
5 Gas lighter- with controllable flame height
6 Revell Proffessional liquid polystyrene cement- this has in my experience offered the best compromise so far with liquid poly adhesives- not so thin that it evaporates too quickly-not so thick as to leave blobs
7 Plentiful supply of sharp blades. Knifes are a personal choice-essential is only that they are sharp- blunt knife edges crush sprue- and distort it before use
8 Flat 'stamp collectors' type of tweezers- again has all edges reduced to soft radii by polishing- ideal for the application of very thin longitudinal horizontal ( antennae) sprue runs, where the weight( really!) of the sprue hanging over the edges of conventional narrow tweezers could kink the sprue piece
Application of stretched sprue rigging to ship
Essential preparation...When constructing the model substitute plastic or resin masts and yard arms with metal replacements.
Rigging places cumulative loads on masts and yards-these can distort and pull out of alignment plastic masts.
Place a drop of the Revell liquid poly cement on a flat surface.
I use old CD's or DVD's as my glue pallete. I use a fresh pool ( 3 drops or so) of glue for each end of a piece of rigging; space and adequate supply of glue is important!
I rig midships outwards, lower rigging first working upwards. This generally prevents problems with access at the closing stages of rigging.
On the ship that is being used here as the example- HMS Scylla- the signal halyards terminate next to the flag lockers at the aft end of the lower bridge.
Select an over-length piece of tan sprue for running rigging, hold in tweezers, dip one end into fresh pool of glue; the sprue will start to melt and from a small ball.
Apply the 'ball end' to the LOWER end of the signal halyard position. Holding the model at a suitable angle, rest the sprue 'halyard' on to the chosen yard.
Make a new pool of glue. Dip cocktail stick in glue and apply a tiny drop onto the chosen position on the yard; and using tweezers PUSH-not pull the sprue onto the droplet of glue- it will grab immediately.
Using the same cocktail stick, dipped in a fresh pool of glue, apply the stick onto the yard to the side of the sprue; it will melt and kink,- remove the cocktail stick-complete with the waste sprue.
You should now have a clean attachment- with no odd ends or blobs.
On this model I applied small blobs of WHITE Glue( PVA/wood glue) to the underside of the yard to simulate the pulley-blocks for the signal halyards; ergo I needed to apply tan sprue to EACH side of the blobs- halyards go up as well as down!
 Viewed 2884 times")
Do not worry unduly about getting it taut or straight...
The same procedures apply to all aspects of rigging standing rigging, braces and shrouds etc.
Once one side of the yards have been rigged-it is time to tension the rigging !
Many modellers have their pet techniques for this, ranging from dental hot wax tools to soldering irons to lighting a match and using the dying heat from the extinguished match...
I have no experience of the dental wax tool-so cannot comment.
The soldering iron has the disadvantage that the heat radiates in all directions- including where one may not wish to have heat!!
The match method has the inherent disadvantage that it is an inconsistent source- ie it gets colder unpredictably.
I use smoke... generated by Incense ( Joss) sticks in chosen aroma-sandal wood, apple etc etc! 
Smoke is a directional source- ie heat rises- as does smoke. To get the smoke to pass across the chosen piece(s) of rigging the model must be held ABOVE the smoke....
For the smoke to rise vertically in a straight line we must eliminate all air movement in the room.
Take frequent breaks and ventilat at short intervals.
By inclining the model at different angles to the smoke source rigging tensioning can be carried out precisely on individual strands of rigging.
 Viewed 2802 times")
Note I am holding the model above me-so that I can see the rigging silhouetted against the white ceiling-and can thereby tune the smoke line to my chosen piece of rigging
 Viewed 2666 times")
This is easy with all 1/700 models- holding the 1/350 resin Roma Battleship above my head was more challenging!!
Attaching vertical lines to horizontal antennas should only be done using Matt varnish as an adhesive-otherwise the longitudinal will melt and snap if poly cement is used...
 Viewed 2636 times")
If it is desired to have the longitudinals sag gently- as in real life; here is a cunning plan!!
All models made of plastic/resin expand as they get warmer. To try and create the above effect we need to make the model longer.!!
I heat the modelling/rigging room to a temperature that is way above that where the model is usually displayed; rig the longitudinals, and tension them to be straight-with the model and its base warm.
When the model cools to normal room temperature an even gentle sag will be visible!
Especially effective in 1/700 square rigged model ships
 Viewed 2712 times")
Lines that split into a 2:1 purchase via a pulley-block-such as on sailing ship braces, can be easily simulated by setting up first one line, then a small dab of white glue-allow to set. add the second line , attach to the white glue using the sprue-dipped-in-liquid poly -as before. The fume will soften the initial line allowing the 'pulley' to fall square between the two lines
 Viewed 2637 times")
Stretched sprue can also be used for 'structural' rigging- where it is collectively load bearing, such as on this SSZ Scout airship on my 1/700 HMS Furious 1917
 Viewed 2731 times")
Tools (from Ship Model Forum)
A couple simple tools that have really helped me are:
Small size nail clippers
nail or "cuticle" scissors
sanding sticks of various grits
squadron putty for seams
plain old white glue for PE
micro sol and micro set decal solvents
future floor polish for a great gloss coat for decals and sealing paint
More on the expensive side but a must have in my book are
Airbrush and compressor
Dremel rotary tool with various attachments
..............................................................................................................
by NukeMM ? Thu Jun 24, 2010 7:45 am
Here are the tools that I use most often........
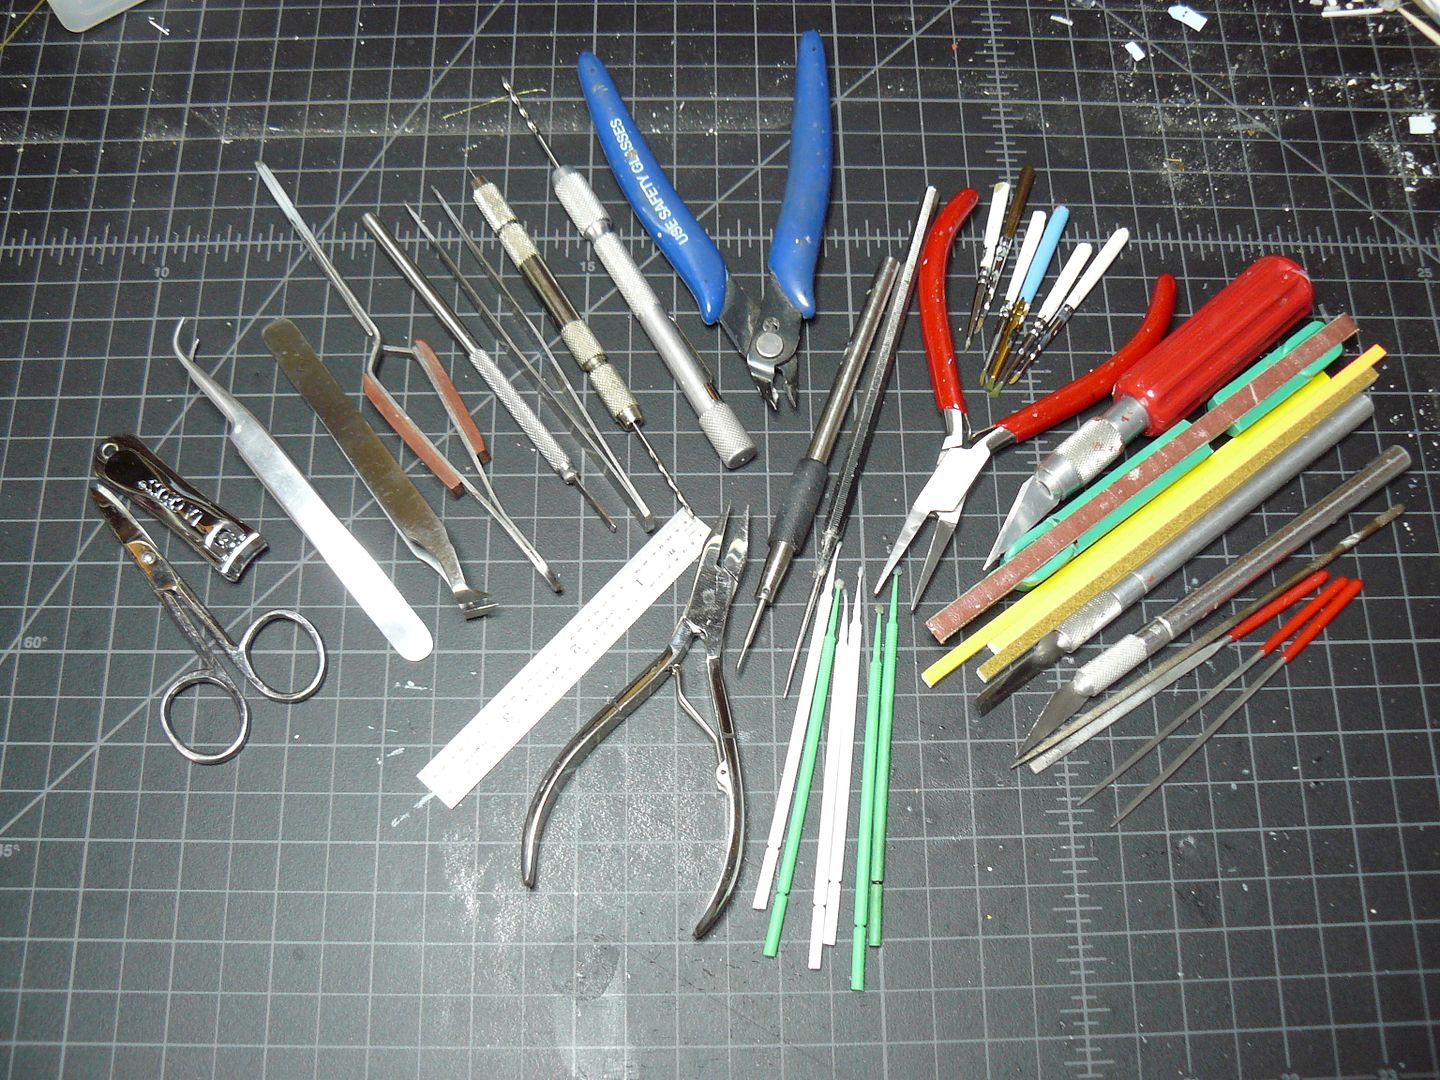 The latest additions have been MISSION MODELS Micro "Chisel", MICRO MARK Micro "Knife", and the mini-file set with the red handles. The in-grown toenail scissors allows for cutting rigging close to the attachment points as does the small fingernail clippers which also come in handy for clipping small brass rod and nipping sprue remains from small parts
Water Effects (from Ship Model Forum)
by JIM BAUMANN Wed Oct 29, 2008 4:24 am
Here is a list of water making techniques:
A good grounding is to be found here:
http://www.steelnavy.com/WavePatterns.htm
-------------------------------------------------------------------------------------------------
thereafter making the stuff....
Jeff Herne
http://www.modelwarships.com/features/h ... _water.htm
------------------------------------------------------------------------------------------------
Hanchang Kuo
viewtopic.php?f=4&t=37641
-------------------------------------------------------------------------------------------------
Jim Baumann
viewtopic.php?f=4&t=37223
viewtopic.php?f=4&t=37406
-------------------------------------------------------------------------------------------------
Carl Musselman
http://www.modelwarships.com/features/h ... ature.html
--------------------------------------------------------------------------------------------------
Rainer Michalek
http://www.modelwarships.com/features/h ... index.html
-------------------------------------------------------------------------------------------------------
Dominic Banton
viewtopic.php?f=4&t=38284
--------------------------------------------------------------------------------------------------
Phil Reeder
http://www.britmodeller.com/forums/inde ... opic=39041
--------------------------------------------------------------------------------------------------
Kostas Katseas
viewtopic.php?f=59&t=34699&p=228855&hilit=water#p228855
---------------------------------------------------------------------------------------------------
-
-
|